How to enable Remote Desktop for your Windows Azure Roles
The latest Azure SDK 1.3 makes it possible to login to the VM of your web/worker role instances via Remote desktop. So you are not limited to use VM Role in case you need to establish a RDP connection to your VM.
This helps you to monitor the error events that occur in your events, also you can install small softwares, copy few files etc, though it is recommended to use Startup tasks with elevated privileges i.e. Admin Mode. (Note that once the machine is restarted your softwares will no longer be there, so better use startup tasks)
The steps to enable and configure remote desktop are really simple.
First you will need to install the latest Azure SDK 1.3 tools for Visual Studio. You can just install VSCloudService.exe as it contains SDK as well.
Once done with the installation, create a new Cloud Service project and add a new worker or web role and then foloow the below steps:
1. Go to http://windows.azure.com and create a new Hosted Service. This hosted service will be the one where you will deploy your roles.
2. Create a pfx certiciate and export its private key. If you already have the certificate then upload that certificate to your service else upload the certificate you just created.
3. Then in Visual Studio, Right Click your service and click Publish.

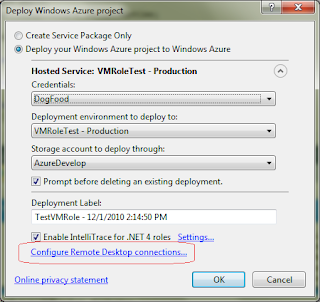
4. In the dialog that appears click “Confiure Remote Desktop connections…”
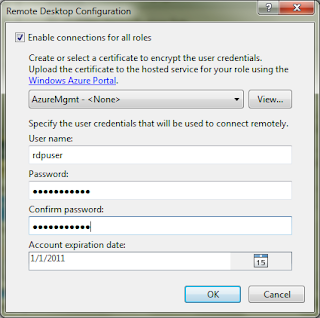
5. Enable the checkbox for "Enable connections for all roles".
6. Select the same certificate that you uploaded to your service in step 2.
7. Enter username, password and expiration date for the credentials that you need to use for remote desktop log in.
8. Click Ok and Publish.
9. Now go back to the portal, select the instance and click on Connect button at the top.
This is it. You are done You can optionally save the rdp file you get in the last step to your desktop to connect to your instance without going to the portal again.
This helps you to monitor the error events that occur in your events, also you can install small softwares, copy few files etc, though it is recommended to use Startup tasks with elevated privileges i.e. Admin Mode. (Note that once the machine is restarted your softwares will no longer be there, so better use startup tasks)
The steps to enable and configure remote desktop are really simple.
First you will need to install the latest Azure SDK 1.3 tools for Visual Studio. You can just install VSCloudService.exe as it contains SDK as well.
Once done with the installation, create a new Cloud Service project and add a new worker or web role and then foloow the below steps:
1. Go to http://windows.azure.com and create a new Hosted Service. This hosted service will be the one where you will deploy your roles.
2. Create a pfx certiciate and export its private key. If you already have the certificate then upload that certificate to your service else upload the certificate you just created.
3. Then in Visual Studio, Right Click your service and click Publish.

4. In the dialog that appears click “Confiure Remote Desktop connections…”

5. Enable the checkbox for "Enable connections for all roles".
6. Select the same certificate that you uploaded to your service in step 2.
7. Enter username, password and expiration date for the credentials that you need to use for remote desktop log in.

8. Click Ok and Publish.
9. Now go back to the portal, select the instance and click on Connect button at the top.
This is it. You are done You can optionally save the rdp file you get in the last step to your desktop to connect to your instance without going to the portal again.


No comments: